
Blog Posts on 3D Rendering Engines and Graphics APIs
2025
-
Commonly Used Libraries in 3D Graphics Rendering
(work in progress…)
3D Model Loader
Some of the commonly used 3D model loading libries are tinyobjloader (limited to the
.objformat), tinygltf, ASSIMP (supports wider range of formats). Here is a brief comparison between different.obj parser libraries.ASSIMPis on of the most popular choice for 3D model handling. It is cross-platform and supports over 40 types of 3D model formats including some of the popular production formats, Collada, 3DS, ASE, DXF. However, the limitation could the the point cloud data formats. It loads a 3D model data structure and presents it on the graphics API readable format. There are two type of data structures Assimp presents (i) Array of Structures (AOS) and (ii) Structure of Arrays (SOA).Texture and HDR Lighting etc. Asset Handler
The 3D model loading libraries often limited to the mesh loading. Therefore, additional library is required to handle the textures. For instance, stb_image is often a good match for
tinyobjloader. As and advantage,stb_imageis a header only library which is easier to integrate on a running project. However, some other libraries, e.g., soil and soil2 is more advance version thanstb_image.Some of the other choices could be FreeImage (cross platform, supports PNG, BMP, JPEG, TIFF), OpenImageIO (supports PNG, TIFF, TARGA, JPEG), SDL_ttf, DevIL Library (load 2D images with DevIL and create textures), SFML.
Other than the general formats for the textures, the EXR is a common format for image-based lighting. The OpenEXR is an excellent library to handle the image-based lighting (IBR).
Input-Output
Graphical User Interface (GUI)
Some of the commonly used GUI libraries are the Dear ImGui, AntTweakBar, Qt, etc. Each of the libraries have their own advantages and limitations. For example, to the best of my knowledge (2026), the AntTweakBar is limited to the OpenGL, DirectX (9, 10, and 11 version).
The Dear ImGui is a poular choice for many open-source projects. A simple workflow for adding to the project could be:
- Add ImGui Headers ti the project
- Add ImGui State Variables
- Initialize ImGui
- Create Menu Bar (or any other GUI functionality needed) Function
- Important: Update Main Rendering Loop
-
Unreal Engine: Multi-Display Rendeirng with nDisplay Plugin
(work in progress…)
When it comes to multi-GPU and multi-display rendering (e.g., rendering a display wall), the Unreal Engine’s
nDisplay plugincould be very useful. In my earlier rendering career, I had handful experience on real-time multi-machine rendering. I am writing this blog from my experience of 2020-2021. Meanwhile many things may change or updated. I will cross-check at my convenient time. The alternatives ofnDisplaycould be SAGE Web Application andNVidia Mosaic. However, the NVidia Mosaic comes default with the high-end GPUs, e.g., NVIDIA Quadro M4000 and higher. It allows warping (geometry corrections) and blending (intensity adjustments). Moreover, the software spans any application across up to 16 high-resolution panels or, projectors from a single system.Now, back to the
nDisplayplugin. ThenDisplayruns in three ways: (i) from the project template (.uproject), (ii) as an executable (File >> Package Project >> Windows), and (iii) enabling nDisplay in existing project with nDisplay plugin. I will follow the first approach, running from project template.Running from Project Template
nDisplayLauncher.exe (
\Engine\Binaries\DotNET), nDisplayListener.exe (\Engine\Binaries\DotNET), configuration file (.cfg), and VRPN (virtual reality peripheral network) are four important attributes for working with nDisplay.- Find the
nDisplayLauncher.exeandnDisplayListener.exeunderUE_version >> Engine >> Binaries >> DotNETfolder. I used Unreal 4.24 version. - Run
nDisplayLauncher.exe,Addthe configuration file and hitRun
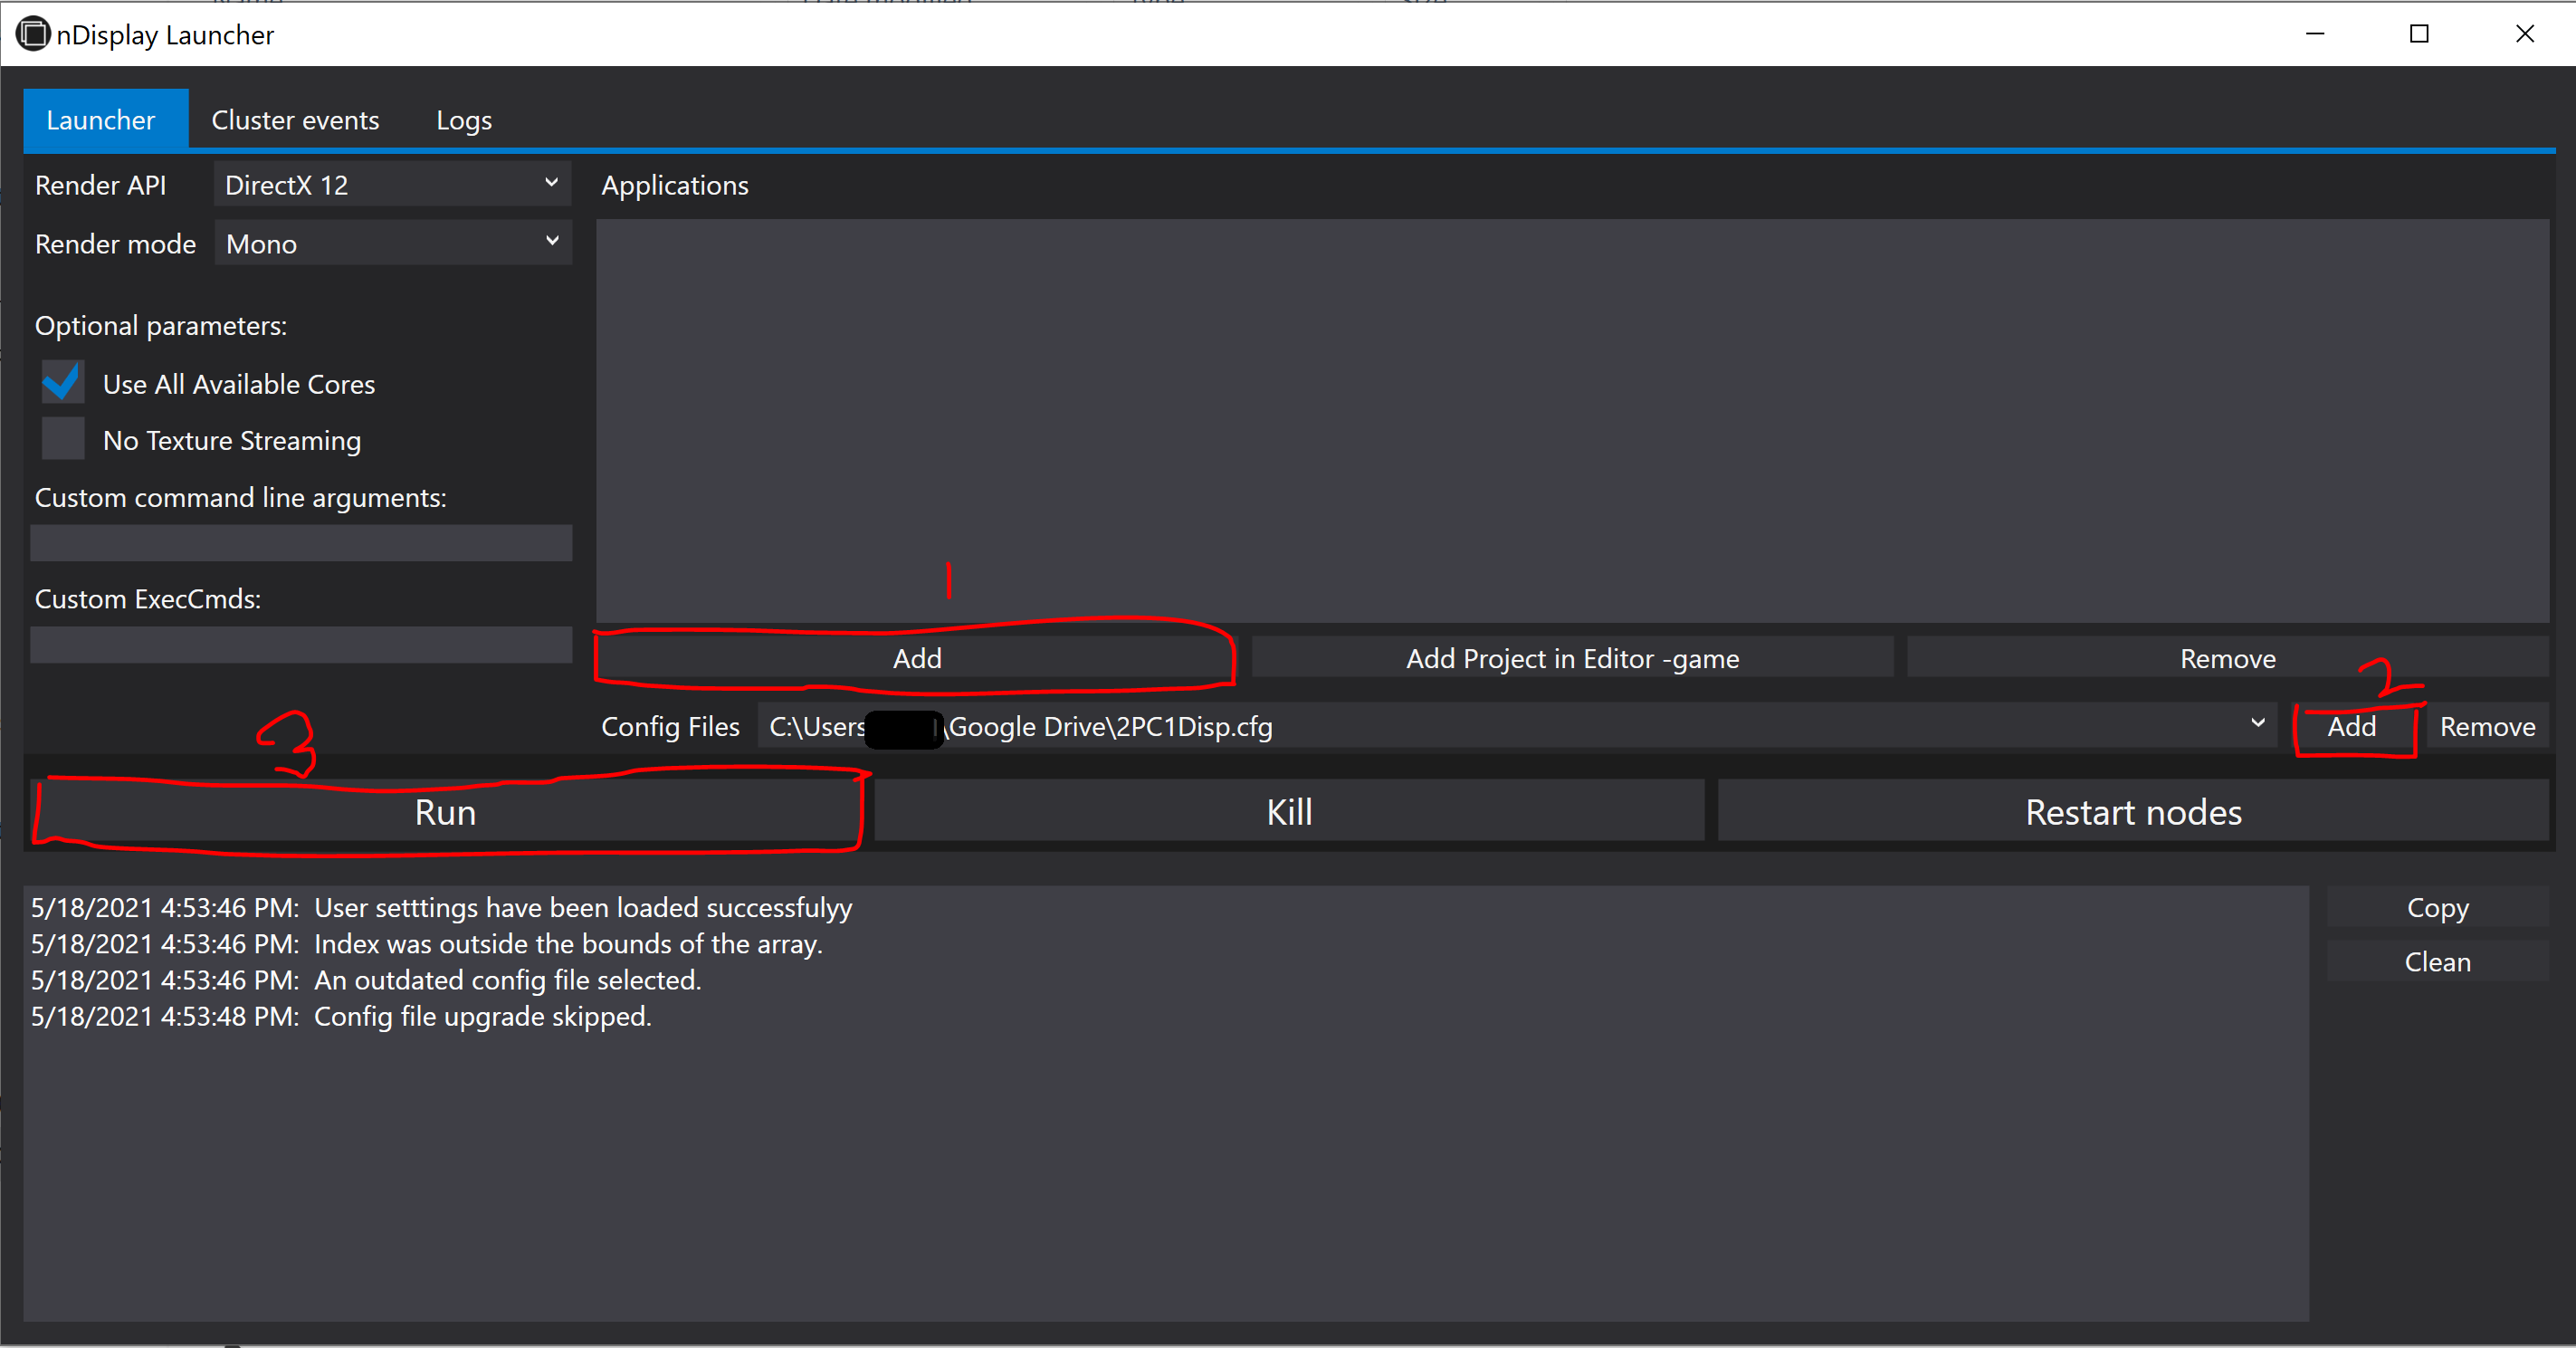
Figure 1. nDisplay layout. - It is also possible adding
nDisplayafter packaging the project asproject_name.exe. For that,- find the
UE4Editor.exeunderUE_version>> Engine>> Binaries >> Win64 - add nDisplay in existing project, See More
- find the
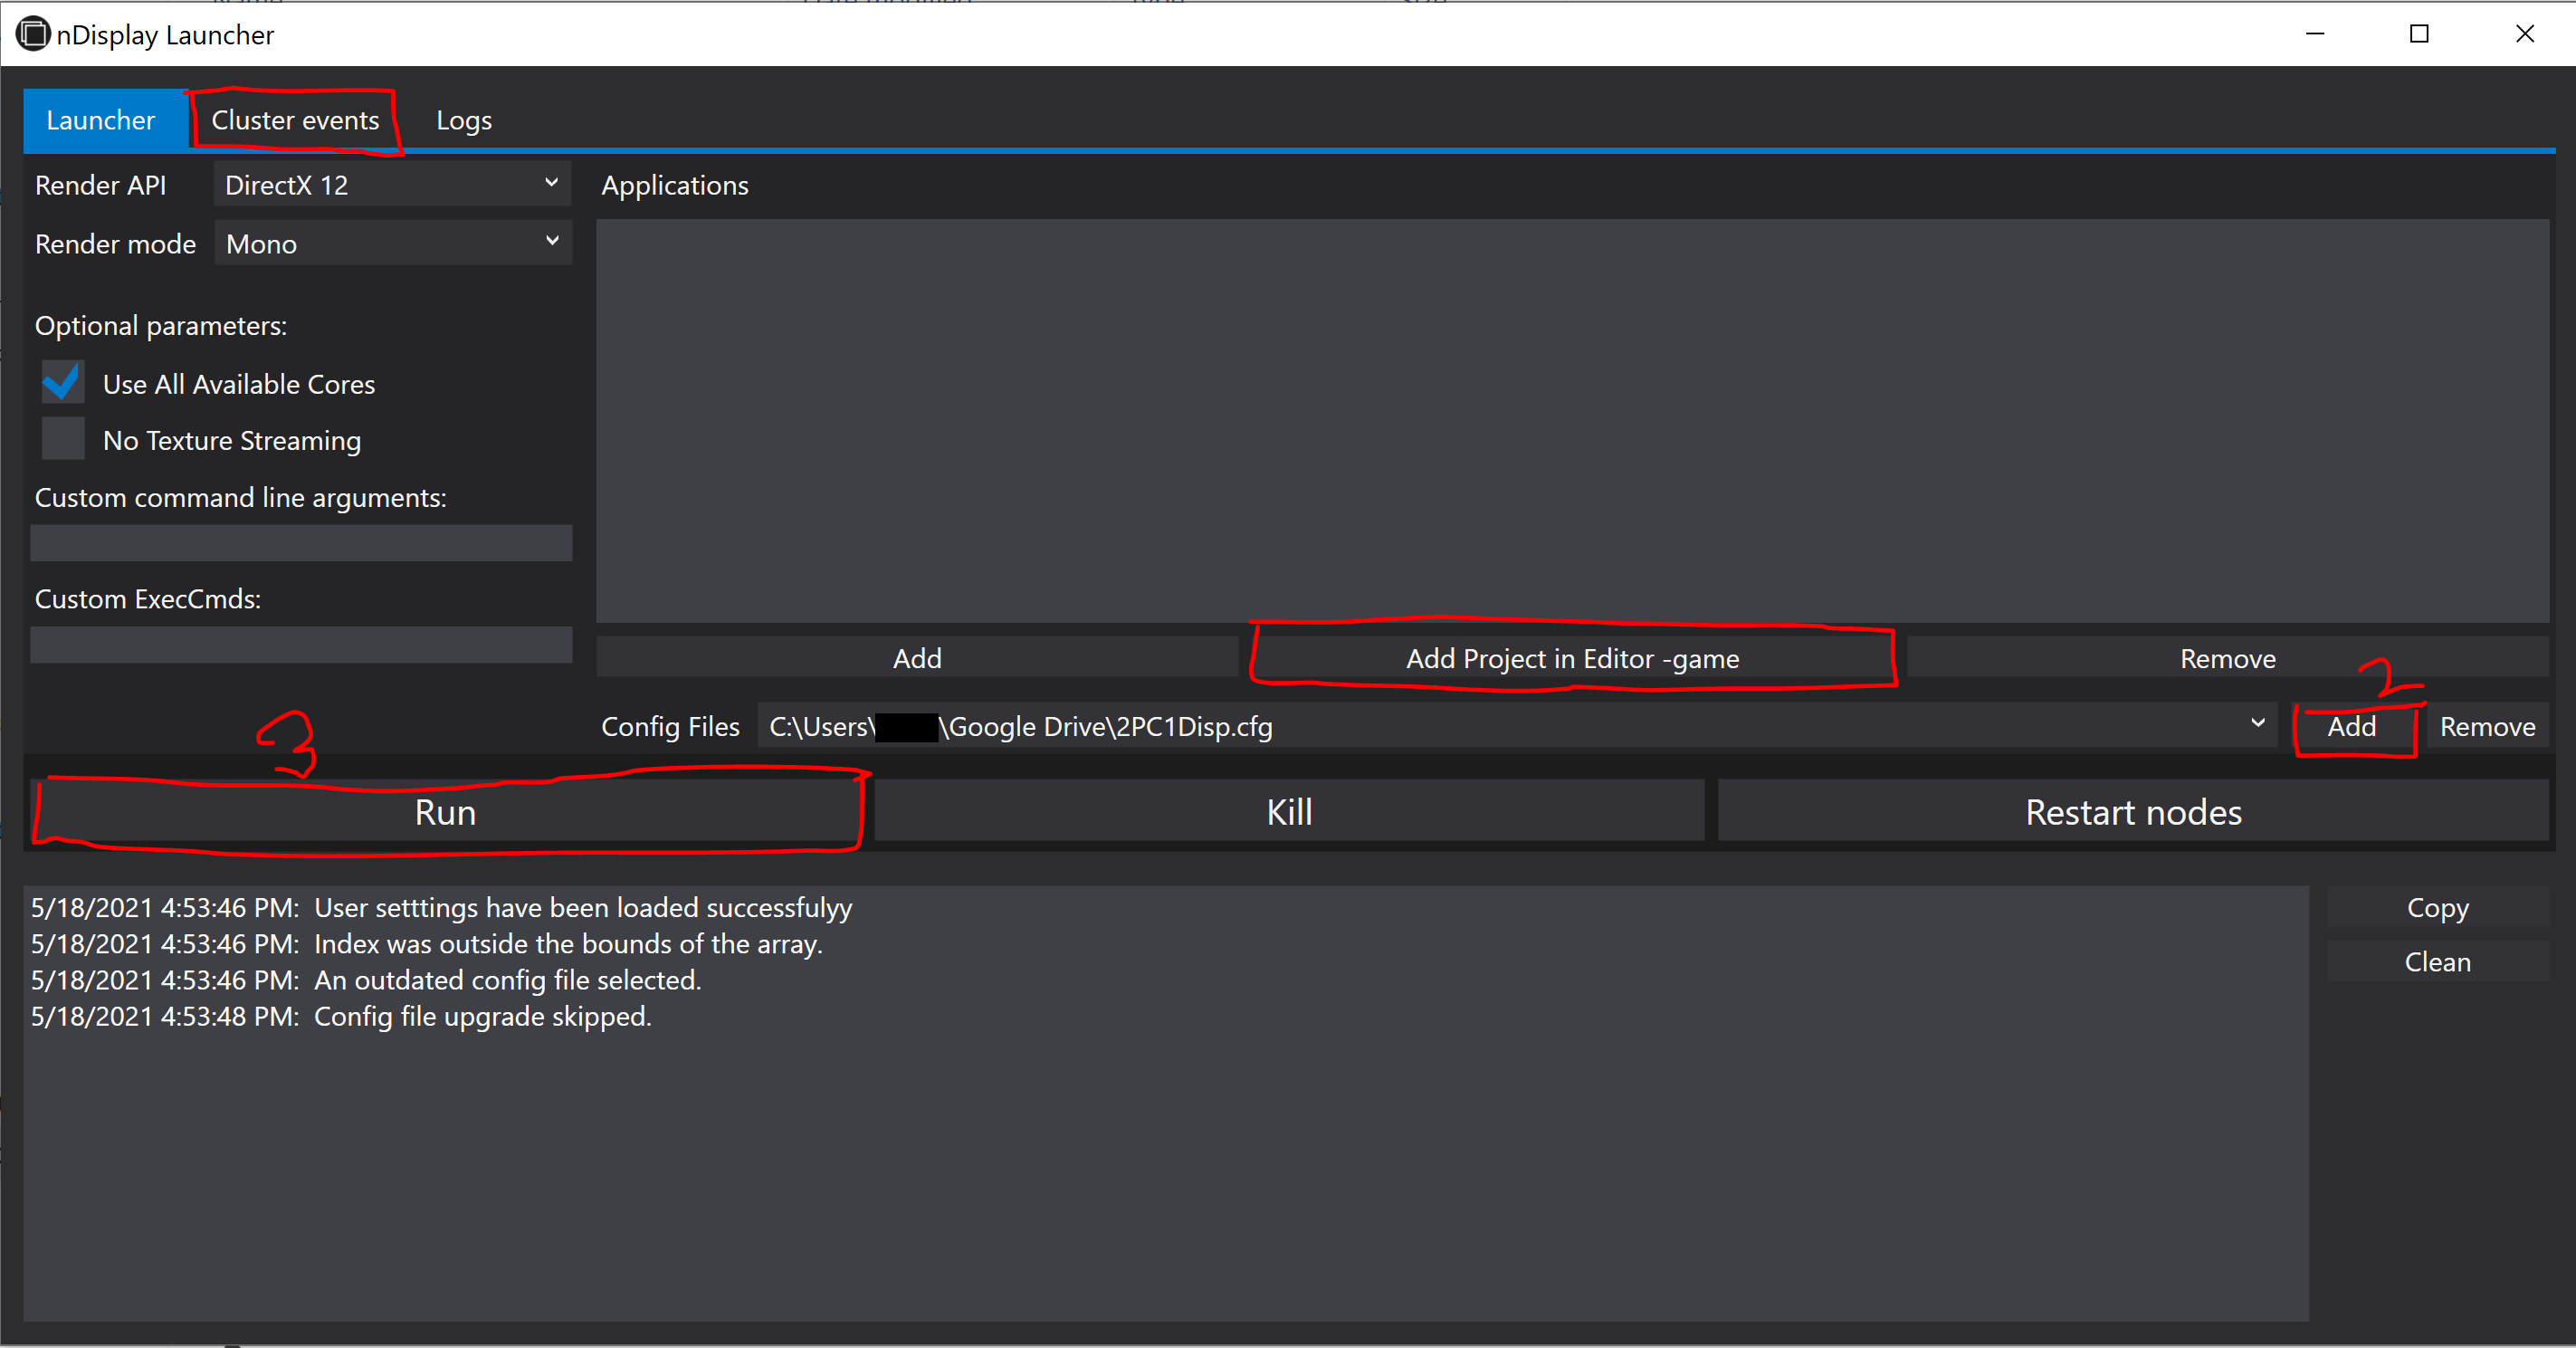
Figure 2. nDisplay layout. Virtual Reality Peripheral Network (VRPN)
VRPN converts data from most devices to mostly three types: Tracker, Analog and Button. The Tracker type holds a position and an orientation. The Analog type is used for any type of axis: joystick axis, mouse axis. The Button type is used for any type of binary button: joystick button, mouse button (See more).
- We need
vrpn_server.exeandvrpn.cfgfile. The version should be 7.33. - A complete list of VRPN supported trackers can be found here. The devices currently do not support VRPN, need to manually add in the source code. Instructions can be found in Client side VRPN Devices and Creating a new device class.
nDisplay Sync Option
Synchronization is not compulsory for large number of displays, but optional for better performance. The Synchronization supports NVIDIA Quadro Sync for frame consistency, flexibility, and scalability. Some of the high-end compatible GPUs are (2021 list):
- NVIDIA RTX™ A6000
- NVIDIA RTX™ A5000
- NVIDIA RTX™ A4000
- NVIDIA A40
- Quadro RTX™ 8000
- Quadro RTX 6000
- Quadro RTX 5000
- Quadro RTX 4000
- Quadro GV100
For more about Quadro Synch II, Check.
Trouble Shooting
- The project need to be in a
common folderfor all the nodes. Agoogle drivecan also work for this purpose. - I previously saved the project in
master machineand shared withslave machine. But it did not work until I save the project in theslave machine. - Address will be the IP address of the computer running this Unreal Engine instance. Must be an
IPv4address,IPv6is not supported.
- Find the
-
Tamashii Beginner Tutorial
Tamashii is an excellent
scientific rendering frameworkunder development by the Department of Computer Graphics, TU Wien. Its main goal is to simplify the creation of research applications in the field of computer graphics by providing a fundamental structure in the form of libraries implementing resource loading, input handling, user interface creation, a complete rendering framework, and graphics API abstraction. The backend graphics API is Vulkan. However, Tamashii only supports single display systems, and \textbf{has not been modified for VR.}Prerequisite
- CMake 3.14.0 or the latest
- Vulkan SDK 1.2.162.0 or the latest. I have also installed the
VulkanRT-1.2.162.0-Installer.exe. The files underC:\Windows\SysWOW64. - graphics driver 450.0 or the latest
- Operating system
x64(for Windows)
Clone the Tamashii Engine
git clone --recursive https://gitlab.cg.tuwien.ac.at/llipp/tamashii.git
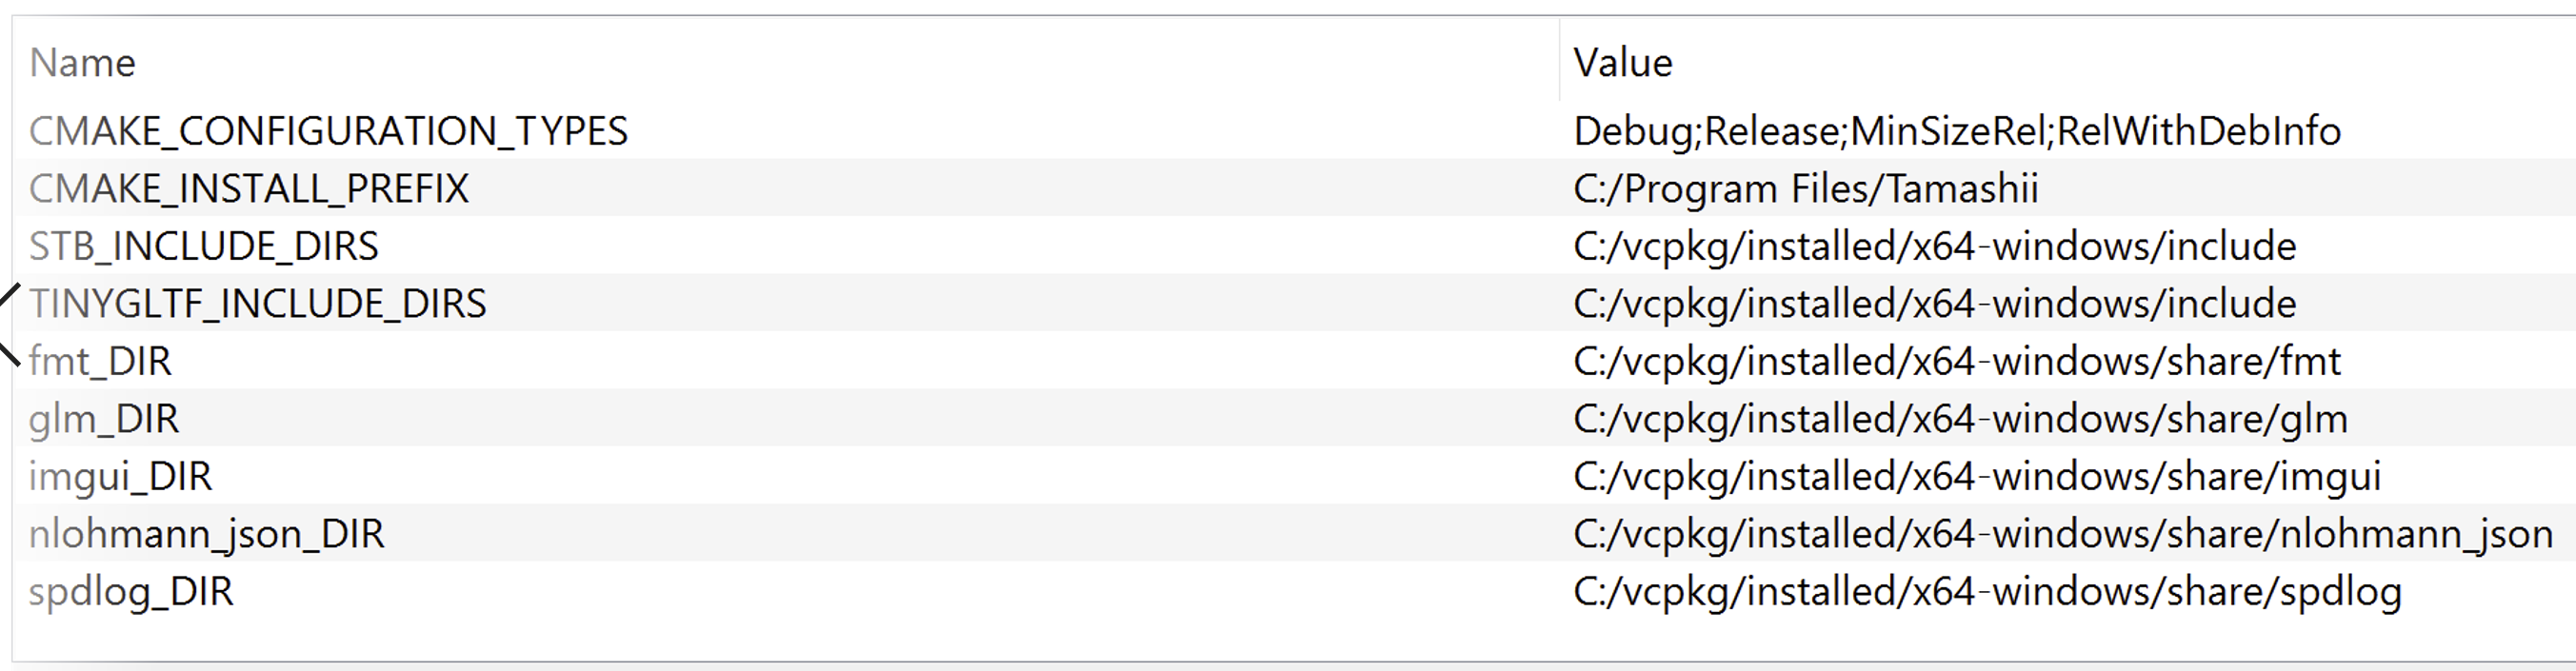
3. Configuration Windows PowerShell (add to the
Environment Variable)C:\Program Files\CMake\binC:\Program Files (x86)\Microsoft Visual Studio\2019\Community\MSBuild\Current\BinC:\vcpkg
4. vcpkg
git clone https://github.com/microsoft/vcpkg.git- Open PowerShell, and track the vcpkg folder
- run
.\bootstrap-vcpkg.bat, it will create the vcpkg.exe - vcpkg install (for Tamashii)
tinygltf:x64-windowsnlohmann-json:x64-windowsimgui[win32-binding]:x64-windowsstb:x64-windowsglm:x64-windowsspdlog:x64-windowshapply:x64-windowsImguizmo:x64-windowstinyobjloader:x64-windows vcpkg integrate install- Additionally, vcpkg might need to add in the
Environment Variable,Environment Variable >> System Variable >> Path (C:/vcpkg)
5. Linking
- run
make.bat(it will create theCMakeLists.txt) - if Environmental Variable Path is provided, then no need the next step (!).
- modify
set(CMAKE_TOOLCHAIN_FILE "C:/vcpkg/scripts/buildsystems/vcpkg.cmake"to the CMakeLists.txt (!) - in tamashii folder, type the command in powershell
cmake -H. -B_project -G "Visual Studio 16 2019" -A "x64" -DCMAKE_TOOLCHAIN_FILE=/path/to/vcpkg/scripts/buildsystems/vcpkg.cmake
6. Additional Include directory (properties»C/C++»General)
C:\VulkanSDK\1.2.162.0\IncludeC:\tamashii\include (for tamashii engine, and renderer)
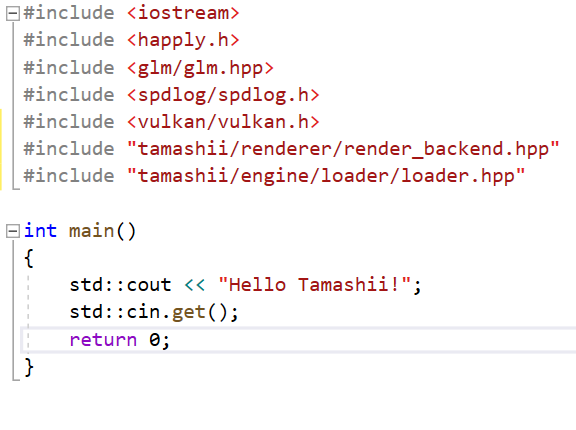
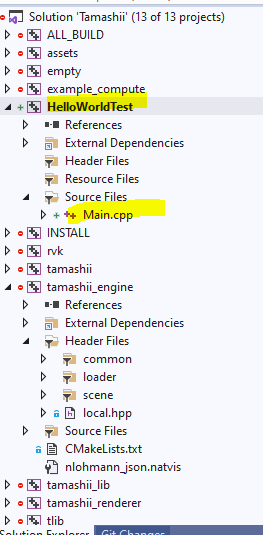
7. Hello World
- open the solution (
.sln) file (in my case it is under_project) - add » new project
- set as startup project
- the sample program is given below:
8. Trash: Previously Tried (after point 5.3, Linking section)- open CMakeGUI, configure (however, it has created error for me in C:\tamashii\src\rvk\CMakeLists.txt)
- I have manually provide the locations (Not a robust solution)
-
tauray
At the time of writing this (October, 2025), there are limited publicly available rendering engine that works for
real-time stereo path tracing. The slow convergence with pixel dense display in VR is limiting real-time stereo path tracer. However, with the RT-core and GPU architecture improvements, I am noticing the recent trend ofphysically accuratelight simulation in real-time rendering, e.g., games. Therefore, definitely with time, the real-time stereo path-tracing (and with other advanced global illumination algorithms) would be a real thing once we will overcome frame-rate constraint. Physically-accurate light simulation will minimized the difference between real and virtual world and extend the path oftrue immersion. Currently, 90 fps has become a golden standard for VR. However, the higher is the better for immersion.So, I am talking about already developed
real-time stereo path tracerthat is publicly available for developers and researchers. The options are very limited due to the slow convergence. To the best of my knowledge, there isRay VRfrom Vinicius Silva associate with the publicationRAY-VR: RAY TRACING VIRTUAL REALITY IN FALCOR. There is another publicationAccelerated Stereo Rendering with Hybrid Reprojection-Based Rasterization and Adaptive Ray-TracingfromNiko Wißmann et al.. I believe the codebase called AcceleratedStereoscopicRendering. Both of these codebases are based on the older version of NVidia’s Falcor framework, either 3.2.1 or 3.2.2. These were the last versions had OpenVR support. Meanwhile the OpenVR has been deprecated, as well as the latest Falcor has removed the VR support. Moreover, these repositories are not well mentioned.On the other hand,
taurayis from the Virtual reality and Graphics Architectures (VGA) group, Tampere University. The group has long tradition of cutting edge real-time path tracing research. The codebase is regularly updated.taurayis mostly focused on the multi-view display, i.e., light field display. Besides, there are rasterization, path tracing algorithm. Additionally, the lastestReSTIR DIandDDISH-GIis also included as bonus. However, theReSTIRimplementation does not currently reuse between viewports. It means, both views have separate reservoirs and don’t reuse between each other.Tauray is a clean, well-structured C++17/Vulkan real-time renderer with ray tracing (KHR RT), solid abstraction layers (device/context, stages/pipelines, G-buffer), multi-GPU strip distribution, OpenXR/Looking-Glass displays, and built-in denoisers (SVGF, BMFR). Overall: production-quality foundations with room for small ergonomics, performance, and XR/foveation upgrades.
Building
Tauray development is Ubuntu focused. The building instruction for Ubuntu is pretty straight forward (See Building). Working with Windows OS is also possible without the multi-GPU rendering feature. I have tried with Windows 10. Here is a bit details about the building process:
- VCPKG libraries
cd C:\vcpkg vcpkg install sdl2[vulkan] glm czmq nng libcbor assimp vulkan openxr-loader vcpkg integrate install - build
mkdir build cd build cmake .. -DCMAKE_TOOLCHAIN_FILE=C:\vcpkg\scripts\buildsystems\vcpkg.cmake -G "Visual Studio 17 2022" -A x64 - run
cd ..\
//--renderer=path-tracer --display=openxr
.\build\Debug\tauray .\test\test.glb --display=openxr --renderer=path-tracer
// with env-map
.\build\Release\tauray.exe test\test.glb --display=openxr --renderer=path-tracer --envmap=hdr\test.hdr
(work in progress…)
- VCPKG libraries
-
Popular 3D Graphics APIs
High-level API
The OpenGL sometimes considered as a high level graphics API. It is always the starting point for beginners. However, the applications are limited to the industry. Moreover, compare to other widely used APIs, e.g., Vulkan, DirectX, it is sometimes considered as a high level API. This
levelis referred to the graphics hardware and memory control.- OpenGL
Low level APIs
There are many low level graphics APIs. Some of the commonly used are (Ref.)
- Microsoft DirectX 11, 12, DXR
- NVidia Falcor (DXR-based)
- Vulkan Raytracing (VKR)
- NVidia OptiX
- Metal (MacOS)
I am not sure about Embree so far.
- Intel (CPU-based-renderer)
- Intel Embree
- Intel OSPRay
-
VR Rendering with Unity 6.0+
(WORK IN PROGRESS…)
I am a perception-driven rendering researcher (2026). VR opened the endless opportunity to explore and exploit the human perceptual limitations to simulate
life-likevisualization. However, the evaluation process of a perception-driven rendering often requires rigorous user study. The lack of standard and well accepted perceptual quality metrics (as for now, 2026) makes the evaluation process even more complicated. The user study process for perception-driven research is often designed from the scratch, which is time and cost consuming. Therefore, the focus of this tutorial will be more user study design with Unity game engine. I have used the HTC Vive Pro Eye for tutorial. If you need some basic knowledge regarding eye tracking, e.g., SRanipal plugin and runtime, you can follow this old tutorial; however, using the OpenXR is highly recommended as the OpenVR has already been depricated.Prerequisites
- SteamVR runtime
- Sranipal runtime
Vive-SRanipal-Unity-Plugin.unitypackage, I used version 1.3.6.8. To the best of my knowledge, that is the last updated version (2026). In the SRanipal SDK folder, you will have C, Unreal, and Unity implementations. Drag and drop the package will be visible asViveSRfolder in the project. Any other slightly older version also might work (untested) similarly. For eye tracking, theSRanipal Eye FrameworkunderViveSR/Prefabsis required. Alternatively, OpenXR might also work for eye tracking (e.g.,XR_EXT_eye_gaze_interaction).
Unity and The Rendering Pipelines
For a beginner, it might be confusing to get familiar with different rendering pipelines mentioned in the Unity (at least it was confusing to me) and select the suitable pipeline for the VR. To my understanding, the Unity’s rendering pipelines are classified as below:
- Scriptable Rendering Pipeline (SRP)
- Built-In Render Pipeline (lagacy version, not recommended)
The URP and HDRP can’t be used simultaneously, as both are built with SRP, and their
render pathsandlight modelsdiffer. As per the Unity 6+ announcement (2025), URP and HDRP will be the defaultRender Pipelines, but theBuilt-InRender Pipeline (which is the default for now) will be supported at least 2 years after the release of Unity 6.
2024
-
NVIDIA Falcor Real-Time Rendering Framework Beginner Guide Part 1
Works for NVidia Falcor 8.0, 7.0, and 6.0
Tried to write some instructions from my side on top of the original NVidia Falcor documentation (v6.0, 7.0, and 8.0), as the original Falcor’s documentation often found old and many things has changed since. This post is equivalent to Falcor’s README doc.
This is a work-in-progress, and sometimes, things can go wrong. So, please do not take it as a reference. For more details, please visit Falcor Home and Falcor git.
Prerequisites (Compulsory)
- Win10 v20H2 or newer
- Visual Studio 2022
- Windows 10 SDK Latest
- RTX GPU and latest driver
Developer mode enablein Windows OS (searchFor Developersin Windows)
Installation (Optional Libraries: works for 6.0–8.0)
- Windows 10 Graphics Tools (to run DX12 application with debug layer enabled). Two ways to install it,
- Check on the
windowsicon of your computer, then searchManage Optional Features. Search in theInstalled featuresif you have already theGraphics Tools. If you don’t have it, add on theAdd a featureand searchGraphics tools. If this does not work for you go to next option. - Download an offline package as
.zipthat matches the OS
- Check on the
- NVAPI (
R470R535)- download the latest NVAPI as
.zip - rename the folder name to
nvapiand paste it toC:\Falcor\Source\Externals\packman- I did not have the
packmanfolder, so I created it
- I did not have the
go toC:\Falcor\Source\Falcor\Core, openFalcorConfig.hand change#define _ENABLE_NVAPI0 to 1
- download the latest NVAPI as
- aftermath 2023.2.0.23219
- download, unzip, rename to
aftermathand paste inC:\Users\local-admin\Desktop\Falcor\external\packman
- download, unzip, rename to
- OptiX 7.3
- copy Optix install folder and paste
packman\optix- create an include folder and add the files, except the internal folder
- copy Optix install folder and paste
- MDL_SDK: download the zip file, unzip, rename
mdl-sdk, and paste inpackman - Microsoft DirectX 12 Agility SDK –
packman/agility-sdk - CUDA support (auto detect from environment PATH)
BUILDING Falcor: CMAKE GUI: not recommended
BUILDING: CMAKE CLI 👍🏽 👍🏽 👍🏽
- Either try this: open the CMD and run
cmake --preset windows-vs2022, (may have some unexpected error with VS2017, therefore VS2019 or the latest is recommended)
// if use visual studio 2022 "windows-vs2022" - Windows VS2022 // if use visual studio code "windows-ninja-msvc" - Windows Ninja/MSVC- Or, run
setup_vs2022.bat. If using visual studio code, thensetup.bat - visual studio: Open
Falcor\build\windows-vs2022\Falcor.sln - visual studio: Build the solution. Currently, there are two workflows:
- Mogwei (recommended for prototyping)
- Sample Application
Optional Libraries
- See the
CMakeLists.txtfor missing (optional) libraries- optix: see previous (4)
- aftermath: see previous (3)
- nvapi: see previous (2)
- mdl-sdk: see previous (5)
- If the Optional Libraries are appropriate:
- FALCOR_HAS_D3D12: TRUE
+ FALCOR_HAS_D3D12: TRUE
- FALCOR_HAS_VULKAN: ON
+ FALCOR_HAS_VULKAN: ON
- FALCOR_HAS_AFTERMATH: OFF
+ FALCOR_HAS_AFTERMATH: ON
- FALCOR_HAS_NVAPI: OFF
+ FALCOR_HAS_NVAPI: ON
- FALCOR_HAS_PIX: ON
+ FALCOR_HAS_PIX: ON
- FALCOR_HAS_CUDA: ON
+ FALCOR_HAS_CUDA: ON
- FALCOR_HAS_OPTIX: OFF
+ FALCOR_HAS_OPTIX: ON
- FALCOR_HAS_D3D12_AGILITY_SDK: ON
+ FALCOR_HAS_D3D12_AGILITY_SDK: ON
- FALCOR_HAS_NRD: ON
+ FALCOR_HAS_NRD: ON
- FALCOR_HAS_DLSS: ON
+ FALCOR_HAS_DLSS: ON
- FALCOR_HAS_NV_USD: ON
+ FALCOR_HAS_NV_USD: ON
- FALCOR_HAS_MDL_SDK: OFF
+ FALCOR_HAS_MDL_SDK: ON
- FALCOR_ENABLE_USD: ON
+ FALCOR_ENABLE_USD: ON
Falcor 8.0
- Falcor 8.0 was released on 19 Aug 2024 with a lot of amazing features and previous bug-fix
- While I was updating old repo from 6.0, I was facing
openvdbrelated runtime error, which I have fixed with on machinevcpkg openvdb- Additionally:
openvdbadded two more errors, in releaseImath-3_1.dll, and in debugtbb12_debug.dllwas missing, which I resolved with on-machinevcpkg
- Additionally:
- Finally, the Falcor readme says to use
nvapi R535(I guess they forgot to update here), did not work for me. I have tried with the latestnvapi R560working. You can find the latest nvapi here - Although the original document still says using
OptiX 7.3, I have tried with the latestOptiX 8.0.0, and it is working fine. Other thanOptiX 7.3, I have also tried withOptiX 7.5, 7.6, 7.7, working fine as well. Further investigation may required. You may also need to fix dll missing, e.g.,zlibd1.dll.
Old Resources (not recommended)
- I have a feeling that after Falcor 6.0, Falcor is a completely new framework.
- Ray tracing gems ebook (2019)
- OlD: Chris Wyman: Falcor 3.1.0 Tutorial Series: code does not work, but documentation is good 👍🏽
-
Unreal Engine: Variable Rate Shading with UE v4.23.1 and HTC Vive Pro Eye
I have divided the instructions into three sections:
- Hardware, software, and driver prerequisite
- Cloning and building Unreal Engine 4.23.1
- Working with dynamic VRS in VR
Part 1: Hardware, Software, and Driver Prerequisite
- see Marios Bikos tutorial. Technically, any latest hardware and driver should work
- You need the SteamVR and SRanipal runtime.
Part 2: Cloning and Building UE 4.23.1
git clone --single-branch --branch VariableRateShading-4.23.1 https://github.com/ViveSW/UnrealEngine.git. For cloning as I will suggest you choose any simple director, e.g.,C:\- Caution: This part was ignored in the original tutorial. Replace the existing
Commit.gitdeps.xmlfile with the latest download:https://github.com/EpicGames/UnrealEngine/releases/download/4.24.2-release/Commit.gitdeps.xml. The existingCommit.gitdeps.xmlhas a problem and it will generate an error message if you trySetup.bat - Now, open
cmd/Windows PowerShell(run as administrator) and you can run theSetup.bat. Or, you can also run directly theSetup.batasRun as administrator - If you are using cmd/Windows PowerShell, run the
GenerateProjectFiles.bat -2017, or you can run theGenerateProjectFiles.bat - Then, open the UE4.sln with Visual Studio 2017 Community.
- Under Engine, select the UE4
Set as a startUp Projectand build. - Caution: search
unreallightmassin Solution Explorer and build. Later, when you will work on the project, theLighting build failederror may pop up. You can do this step later if you’re facing the error.
Part 3.1: Super Runtime Animation Pal
- First, Download and configure SteamVR
- Then, you need the SRanipal runtime, (1) download and install with msi. You can download and install the version provided by Developer Portal. A vive account will be required.
- (2) I am using 1.3.6.12 version. As per suggestion, install the latest version can be downloaded through Vive Console for SteamVR
- After that, download the SRanipal SDK. I read online forums the latest versions may have some bug. The latest stable version is 1.3.6.6. You can find that in the archive or google a bit.
- I am using version 1.3.6.6.
Part 3.2: Working with dynamic VRS in VR
- I am working with SRanipal 1.3.6.6, copy and paste it under
Plugins - You need to restart the UE
- Edit» plugins
- Project Settings » Plugins » VRS Settings
SRanipal
Resources:
- Marios Bikos’ Tutorial
- Marios Bikos’ Website
- https://docs.vrcft.io/docs/hardware/VIVE/sranipal
- UE 5.4, I still do not find the dynamic VRS, only static VRS is there for optimization.
2023
-
OptiX Related Different Rendering Engines and Libraries
(***Constantly upgrading this page at my free time. Some information you may find misleading, non-correct, or already obsolete)

Resources:
Significant projects on OptiX
Other Tools Linked with OptiX
- NVIDIA RAY TRACING DOCUMENTATION
- Material Definition Language
- NVidia vMaterials
- Open Shading Language
- NVidia IRay
- NVidia Iray Server
- NVIDIA IndeX
- Frameworks and Software based on OptiX:
- OptiX Wrapper Library
- Commercial Grade Rendering Engines with OptiX back-end
- Github project, did not checked yet!
- Kiraray with optix and vulkan, windows only 👍🏼 👍🏼
- LightHouse 2 (real-time GPU path tracing framework)
- Scientific Visualization based on OptiX
- Notable Rendering Engines (research purpose, without optix?)
- NVIDIA RAY TRACING DOCUMENTATION
2022
-
OptiX01: Tutorial 01 (7.0-7.5)
(work-in progress…)
Tutorial 1:
In OptiX, before starting ray tracing on the GPU, it is necessary to copy data from the CPU side to the GPU side, build an AS, build an SBT, etc.
- create Context (optix, device, and cuda context)
- crease Acceleration Structure (aka, build)
- create Module (that holds the programs from CUDA, called shader in OpenGL, Vulkan, and DX)
- create Program Group/s (hold one or more Modules)
- create Pipeline
- create Shader Binding Table
Programs
- Closest Hit Program: most common, and it is executed when there is the closest intersection between ray and object. Typically the purpose of the closest hit program is to determine the color of the intersection point. The user can create multiple closest hit programs and bind each to objects in the scene, so that different objects may have different appearances Ref: game work library documentation, older optix version.
- Miss Program:
- Ray Generation Program: To create the rays themselves, we will use a pinhole camera model. The ray generation program is responsible for creating a ray, shooting it into the scene, and copying the resulting color into an output buffer. Output buffers are subsequently used by the host for further analysis or by OpenGL for rendering. OptiX can write to an arbitrary number of output buffers, and those buffers can have arbitrary types.
The single output buffer is a two-dimensional RGBA8 image that is designed for efficient transfer to an OpenGL texture.
-
Installing NVIDIA OptiX on Ubuntu (20.04.01)
- Graphics Info:
sudo lshw -C video - C++, IDE (CLion), Compiler (g++), Debugger (gdb)
- CUDA (NVCC)
- OptiX 7.4/ OptiX 7.5
How to Integrate OptiX-CUDA on Ubuntu 22.04
- To check the Ubuntu version:
lsb_release -a - To find graphics card information:
lspci | grep VGAorsudo lshw -C video - To check cuda capable gpu:
0. Remove all older version driver that comes default with Ubuntu (if needed)
- delete all existing old cuda version (<10.1), that may create
#error -- unsupported GNU version! gcc versions later than 8 are not supported!, following these:sudo apt-get purge nvidia* sudo apt-get autoremove nvidia* sudo apt-get autoclean nvidia* (if necessary) sudo rm -rf /usr/local/cuda* (if necessary)
1. Graphics Driver Update:
- type
nvidia-smiin the terminal- If all older version nvidia driver uninstalled (from previous step), this will give option to install the newer/ latest version using
sudo apt installcommand, e.g.,sudo apt install nvidia-utils-510 - But not all latest GPU driver versions are available
- in that case:
sudo add-apt-repository ppa:graphics-drivers/ppa - then:
Software & Updates --> Additional Drivers
- in that case:
- If all older version nvidia driver uninstalled (from previous step), this will give option to install the newer/ latest version using
- ~You can use this post to update your graphics driver~
Troubleshooting:
// problem 1: if screen color is green, that is color calibration problem
setting >> color calibration >> monitor name >> delete attached color profile >> add Standard space sRGB profile

// problem 2: if stuck in x.Org x server
1. nvidia-smi
2. sudo apt install nvidia-utils-515
// error message
NVIDIA-SMI has failed because it couldn't communicate with the NVIDIA driver. Make sure that the latest NVIDIA driver is installed and running.

3. sudo add-apt-repository ppa:graphics-drivers/ppa

4. sudo ubuntu-drivers list
nvidia-driver-470, (kernel modules provided by linux-modules-nvidia-470-generic-hwe-22.04)
nvidia-driver-470-server, (kernel modules provided by linux-modules-nvidia-470-server-generic-hwe-22.04)
nvidia-driver-510-server, (kernel modules provided by linux-modules-nvidia-510-server-generic-hwe-22.04)
nvidia-driver-515-server, (kernel modules provided by linux-modules-nvidia-515-server-generic-hwe-22.04)
nvidia-driver-520, (kernel modules provided by linux-modules-nvidia-520-generic-hwe-22.04)
nvidia-driver-520-open, (kernel modules provided by nvidia-dkms-520-open)
nvidia-driver-515-open, (kernel modules provided by nvidia-dkms-515-open)
nvidia-driver-515, (kernel modules provided by linux-modules-nvidia-515-generic-hwe-22.04)
nvidia-driver-510, (kernel modules provided by linux-modules-nvidia-510-generic-hwe-22.04)

5. sudo apt install nvidia-driver-520
2. Download CUDA Toolkit (e.g., CUDA 11.6, you can use any other latest version as well)
nvcc --version- From NVIDIA Site Download LATEST CUDA TOOLKIT
2.1. Set CUDA to library path (PATH and LD_LIBRARY_PATH) is often required for other libraries as well
// either these two lines work to add in root
   export "PATH=$PATH:/usr/local/cuda-11.6/bin" >> ~/.bashrc
   export "LD_LIBRARY_PATH=$LD_LIBRARY_PATH:/usr/local/cuda-11.6/lib64" >> ~/.bashrc
   // source ~/.bashrc (what does this command do?)

// or these two lines as above
sudo echo "PATH=$PATH:/usr/local/cuda-11.6/bin" >> ~/.bashrc
sudo echo "LD_LIBRARY_PATH=$LD_LIBRARY_PATH:/usr/local/cuda-11.6/lib64" >> ~/.bashrc
3. Download OptiX and Set directory
 sudo chmod +x file_name.sh
 ./file_name.sh
 // read the agreement until 8.11
 // set the environment variable `OptiX_INSTALL_DIR`
 export OptiX_INSTALL_DIR=/home/bmohanto/Downloads/NVIDIA-OptiX-SDK-7.4.0-linux64-x86_64 //(no gap between `=`)

// above line did not work on latest Ubuntu 22.04 LTS, replace with
sudo echo "OptiX_INSTALL_DIR=/home/vcg0/NVIDIA-OptiX-SDK-7.5.0-linux64-x86_64" >> ~/.bashrc
3.1. Install the pre-requisites (if needed, or can do later according to need)
sudo apt -y install dkms libglfw3-dev pkg-config libglvnd-dev // ~if cpp package not installed~ // install before cuda toolkit installation build-essential // if freeglut needed freeglut3-dev // cmake-curses-gui libtbb-dev //git gitk- ~Package ‘emacs25’ has no installation candidate~ (this is an editor)
4. BUILD and RUN with CMAKE (either from terminal/ use GUI)
// for OptiX 7.5, pre-rquired: (depends on your setting, you might need more or less packages)
sudo apt install doxygen libopenexr-dev zlib1g zlib1g-dev libgl1-mesa-dev libglfw3-dev libxinerama-dev libxcursor-dev -y
// to check installed library:
dpkg -L libLIBRARY_NAME-dev
// to remove library
sudo apt autoremove libLIBRARY_NAME-dev
cmake ..make/make -j 8(for parallel, 8 is the number of CPU cores)- To see the core information, type
lscpu, and see:CPU(s): e.g., 6 Thread(s) per core: e.g., 2 Core(s) per socket: nprocor,cat /proc/cpuinfo | grep preprocessor | wc -lalso can work
<img src="https://user-images.githubusercontent.com/12484581/165559399-7d3ed7a4-74ca-4675-8451-8e89254d5960.png" width=350px\>
Trouble Shooting
- If
nvccproblem, install latest driver, and cuda toolkit. The Cmake Configuration as below:
<img src="https://user-images.githubusercontent.com/12484581/163886737-d8b826b9-1040-4b1c-bcc2-51ec28ea0556.png", width="700", height = "400">
- If
bin2cnot found: (/bin/sh: 1: BIN2C-NOTFOUND: not found)
// try 1 goto all: CMakeCache.txt -BIN2C:FILEPATH=/usr/local/cuda-11.6/bin/bin2c + set(BIN2C /usr/local/cuda-11.7/bin/bin2c) // Try 2: if above modification does not work goto: configure_optix.cmake // comment these two lines -find_program(BIN2C bin2c -DOC "Path to the cuda-sdk bin2c executable.") +set(BIN2C /usr/local/cuda-11.7/bin/bin2c) // Try 3: if these two do not work, keep trying 2 and delete all CMakeCache.txt files. Make a clean CMake Build- If
OptiX_INCLUDE_DIRnot found message shown
goto `FindOptiX.cmake` in `common>> gdt >> cmake` folder and replace the - set(OptiX_INSTALL_DIR ${searched_OptiX_INSTALL_DIR} CACHE PATH "Path to OptiX installed location.") + set(OptiX_INSTALL_DIR "/home/bmohanto/Downloads/NVIDIA-OptiX-SDK-7.4.0-linux64-x86_64")- ZlibStatic_ROOT (CMake Error: The Xinerama library and headers were not found)
Solution:
sudo apt install xorg-dev<img src=”https://user-images.githubusercontent.com/12484581/165559278-29d25a92-44dd-42c7-8685-11930e963b7f.png” width=400px> Fig: Final CMake BUILD
5. OptiX headers (optix.h and friends) not found Please locate before proceeding.
Update the FindOptiX.cmake with set(OptiX_INSTALL_DIR “/home/bmohanto/Downloads/NVIDIA-OptiX-SDK-7.4.0-linux64-x86_64”). This solved the first problem, but lead to another BIN2CC not found, although I have defined bin2cc in cmake build.
This https://github.com/ingowald/optix7course/issues/28 helped me, I have manually modified the CMakeCache.txt and configure_optix.cmake with set(BIN2C /usr/local/cuda-11.6/bin/bin2c). This solved the BIN2CC problem, but lead me to another compile time error.
So finally I deleted all the CMakeCache.txt files, but kept the configure_optix.cmake with set(BIN2C /usr/local/cuda-11.6/bin/bin2c) and made a fresh cmake build.
Resources
- Graphics Info:
-
How to get started (OptiX 7.0-8.1)
OptiX 7.6 (the latest version is mostly recommended)
How to start learning OptiX 7.+
First, go through Keith Morley’s Blog: How to Get Started with OptiX 7
Then watch Ingo Wald’s SIGGRAPH 2019 talk, and read the slides, publicly available in the optix7course repository. The codes access OptiX 7.0-7.4 version, and CUDA 10.1-11.7 latest.
Ingo Wald also worked on an OptiX wrapper library OWL-Project, that could be even easier to follow as modules, SBT, pipelines, etc. are handled easily. If you want to use the wrapper library, you may surely give a try.
I will strongly suggest Shunji Kiuchi’s blog where he has implemented the Ray Tracing in One Weekend algorithms with the latest OptiX 7.4. His github repository explained every step very easily. Similar to
OWL-Project, he is also working on another OptiX wrapper library, PRayGround that supports OptiX 7.3-7.4.You also need to read the API specifications at the OptiX 7.4 official documentation (All in One Place)
At the same time, check the samples that come with SDK
After getting fluency over the API, Detlef Roettger’s OptiX_Apps 👍🏼 repository is the best resource to practice OptiX advanced skills. The repository is currently on OptiX 7.6
You may find an interesting codebase on NV’s Github Repository. Once you have gained much fluency, I will suggest you go through OptiX Utility, currently on OptiX 7.4, CUDA 11.5
If you have queries, that you should have, join the OptiX Discussion Forum. There is always great talk on GTC on Demand, but you need to get registered at NVIDIA first.
OptiX 6.5
If you want to still check out the older OptiX version, e.g., 6.5 (not recommended), João Vítor Silva wrote a good blog on ray tracing the next week, and ray tracing for rest of your life based on RTOW with OptiX 6.5. The best resource for OptiX 6.5 is probably the OptiX Advanced Samples by Detlef Roettger. This NVIDIA GameWorks Doc. has also well explained the workflow of OptiX. Optix-PathTracer is another awesome repository implemented with OptiX 5.0.
Some equivalent terminologies:
OptiX 6.5 OptiX 7.0 and Latest Buffers CUDA Pointers Variables shader binding table Global Scoped Variables Launch Parameters Semantic Variables query functions to access internal state Amorphous programs Tagged Program Types Geometry Group Geometry Acceleraion Structure Group Instance Acceleration Structure Transform just input to instance Acceleration Structure build -
Installing NVIDIA OptiX on Windows 10/11
Windows Installation and Integration (OptiX, CUDA)
- note: developers must check the latest driver version for OptiX, CUDA version, and CUDA host compiler before running
- 1.e) and 3. is not compulsory to run OptiX, 3) is just to run default SDK examples
- nsight visual studio edition automatically installed with CUDA toolkit installation
<img src="https://user-images.githubusercontent.com/12484581/228892646-843bc7c6-6063-43cd-97c9-44451e7481d7.png", width="500", height = "350">
OptiX and CUDA (also OWL) setup steps
- Add OptiX to
environment variable >> System Variables >> New
OPTIX74_PATH C:\ProgramData\NVIDIA Corporation\OptiX SDK 7.4.0- CMake BUILD (for built-in SDK examples)
General troubleshooting (OptiX any version built-in samples BUILDING)
CUDA_SDK_ROOT_DIR : C:/ProgramData/NVIDIA Corporation/CUDA Samples/v10.1CUDA_TOOLKIT_ROOT_DIR : C:/Program Files/NVIDIA GPU Computing Toolkit/CUDA/v10.1VULKAN_LIBRARY :VULKAN_INCLUDE_DIR :MSB8066 Error :in CMake theCUDA_HOST_COMPILERshould be set to proper MSVS 2019 (or any other version) x64 version ofcl.exe. For my case this isC:\Program Files (x86)\Microsoft Visual Studio\2019\Community\VC\Tools\MSVC\14.29.30133\bin\Hostx64\x64\cl.exe(CMake takes slash instead of back slash).NVML_LIBRARYin CMake BuildCUDA Version >> lib >> x64 >> nvml.lib
Optix7course troubleshooting
CMake Error at common/3rdParty/glfw/CMakeLists.txt:347 (add_subdirectory): add_subdirectory given source "docs" which is not an existing directory.-> comment the three lines as doc is missing
-
Unity: Variable Rate Shading Implementation on HTC Vive Pro Eye
This is a short tutorial regarding enabling the Variable Rate Shading (VRS) feature for HMD using Unity. I was working in this project probably in 2022 (can’t remember exactly). However, while writing this (2025), many of the mentioned plugins and SDK might be deprecated or changed. Nonetheless, it is always good to have instruction sets if someone limited to working in Lagacy version. This tutorial is
OpenVR-based. One big change is the eye interactions (gaze position) has shifted entirely to the OpenXR and it is suggested to start with theOpenXR. Someone can follow the complete instruction for eye-track-based interaction. In that case, just ignore theVRSpart. Whenever I can manage time, I will write another updated version here, VR Rendering with Unity 6.0+.Variable Rate Shading (with Unity3D, HTC Vive Pro Eye)
Unlike per pixel shading, the variable rate shading (VRS) allows fine control of shading for each pixel region
(16*16 pixel), with coarse shading, e.g.,1*2, 2*1, 2*2, 2*4, 4*2, 4*4. Besides, super sampling is also possible, e.g.,2x, 4x, 8x. Apart from foveated rendering, content adaptive shading, motion adaptive shading are under the hood of variable rate shading.1. HTC Vive Eye Pro (NVidia VRS Foveated Rendering Plugin)
- HTC Vive Sense SDK gives access to the eye tracking capabilities of Vive Pro Eye through Unity.
- The Tobii XR SDK supports the VIVE Sense SDK
2. General installation
- Install SRanipal (SDK required in next section 3)
- Vive Pro Eye Setup
- Eye Calibration
3. Pre-requisite
- Vive eye tracking SDK (you need to sign in). This also can be found under unity asset store, Steam VR plugin.
- Vive SRanipal
- installer (VIVE_SRanipalInstaller_1.3.2.0.msi), already been installed in previous step
- SDK (SDK-v1.3.3.0.zip) -> you need this for next section, step 2. Interesting instruction could be found here
- Foveated Rendering plugin (from unity asset store)
4. In Unity Project Setting (3 Packages and 1 Plugin)
- create a new project as 3D
- import the Vive-SRanipal-Unity-Plugin.unitypackage into your Unity project, then
Assets >> Import Package >> Custom Package. It will be visible in theProject >> assets >> ViveSR - Project Setting » XR Plugin Management (install)
- However, OpenVR which requires for HTC Vive Eye Pro is not available at this stage, so go to the next step.
- Go to com.valvesoftware.unity.openvr-1.1.4 and download the package. Keep it as .zip (com.valvesoftware.unity.openvr-1.1.4.tgz). Then go to windows » package manager » Add Package from tarball to your project.
- It is under
Package >> OpenVR XR Plugin - OpenVR will be visible now.
- Again open the
project setting >> XR Plug-in Management >>OpenVR Loader (enable)
- It is under
- Download Tobii XR SDK, and unzip (I select
v3.0.178). Go towindows >> Package manager >> Add package from the disk >> package.json(you may need to agree the licence agreement).- important: in the same time, extend the
samplesand importGetting Started(and if you need any other samples, I import everything).Note: If you are using Universal RP, you need to upgrade the shaders in the scene. - It will be found under
Package >> Tobii XR SDK - for test purpose only: Run the
Samples >> Tobii XR SDK >> 3.0.0 >> Getting Started >> Example_GettingStarted - sometime you may need to
openthe file and findTobiiXR Initializer - More about the contents is available here
- If you already has preloaded scene (skip previous step, linked to bullet point (1)
- important: in the same time, extend the
- download the Foveated Rendering Plugin from Unity Asset Store and import in your running project
- the modification options are available after hitting the
run in Unity - the plugin is also available in the github repository
**Prob: how to directly import
foveated rendering pluginfrom the git? Is it only for Unreal Engine? However, the documentation mentioned separate Plugin available for Unity also. ** - To the Main Camera, drag from the ViveFoveatedRendering
plugin Scripts >> ViveFoveatedRendering (.cs) - To modify the VRS, see the document included in the plugin.
- the modification options are available after hitting the
5. VRS Features
- NVIDIA VRWorks VRS
- Support Eye Tracking(for VIVE Pro Eye only
- github: https://github.com/ViveSoftware/ViveFoveatedRendering
6. Outputs


7. Variable Rate Shading (VRS)
VRS is an extension of
MSAA (Multisample Antialiasing). MSAA has a fixed ratio between the rasterized resolution and the shading resolution. VRS allows the ratio to be specifiedper-draw call, per primitive or relative to screen position. There are 2 tiers of VRS- Tier 1 VRS supports
draw-callandper-primitiveselection of the shader sampling frequency. - Tier 2 VRS adds support for s
creen space relative selectionof the shader sampling frequency.
VRS foveated rendering uses screen space frequency control and so requires Tier 2 VRS support.
8. Troubleshooting
8.1. Camera Movement Problems
- Camera Movement: in the
Example_GettingStarted, let the XR Rig InspectorRequested Tracking Mode -> Floor, andCamera Y Offset -> 0. Otherwise movement (position and rotation) is not possible. 1: Besides, you may need to enableProject Settings >> XR Plug-in Management >> Windows Mixed Reality
8.2. Variable Rate Shading
- VRS: Add the
ViveFoveatedRendering.csscript at theMain Camerain the lowest hierarchy of the camera. Project Settings >> Player (scroll down) >> Configuration >> Scripting Define Symbols >> addUSE_SRANIPAL
References
More good reading staff on VRS